5 Lessons Learned From One DIYer’s First Real Attempt at Built-Ins
Trust your gut—er, wood glue.
Updated Oct 12, 2018 5:16 AM
We may earn revenue from the products available on this page and participate in affiliate programs.

Danielle Guerrero isn’t afraid to admit she had no idea what she was doing when she started her home office makeover. “But I tried, and here we are,” she shared with her Instagram followers in a post revealing the built-in desk–slash–storage bench she created completely from scratch. For the Orange County–based design blogger behind Our Nest on Powell, DIY hasn’t just been an opportunity to save money on renovations, it’s been a coping mechanism. “We moved into our home about a year after I lost my sister, and I just really wanted to find something creative to do,” she recalls. “It was empowering. I felt more in control of my life.”
After familiarizing herself with all the basic power tools and becoming quite skilled with drilling pocket holes, Guerrero was ready to tackle her most involved project yet: office built-ins. The project started because her engineer husband needed more space to spread out while working from home (their plain IKEA desk was too flimsy for all his stuff in the long-term). Plus the couple’s cat likes to use his tabletop as a perch during the day. “I had seen other people with built-ins, and I thought it looked so hard [to do]. I didn’t think I could ever do that,” she recalls. But it didn’t take long for her to ward off doubt. What was the harm in giving it a shot, anyway? “And so I did. It wasn’t super-easy, but it was a learning process,” she adds. Ahead, get the lowdown on how she reimagined the space and what she’d do differently if she could go back in time.
Invest in a Table Saw
This is the project that really got Guerrero into using a table saw (a tool in her garage that she was previously always terrified to turn on). The DIY would require cutting large ¾-inch-thick, 15-foot-long sheets of plywood precisely—something that’s tricky to do with a miter saw, which is generally best for trimming smaller pieces of wood, or even a circular saw, which doesn’t come with a guide that ensures straight lines. “It’s a lot of trial and error,” she says of getting familiar with all her power tools. Well, that and watching YouTube tutorials.
Think of All the Parts as Boxes
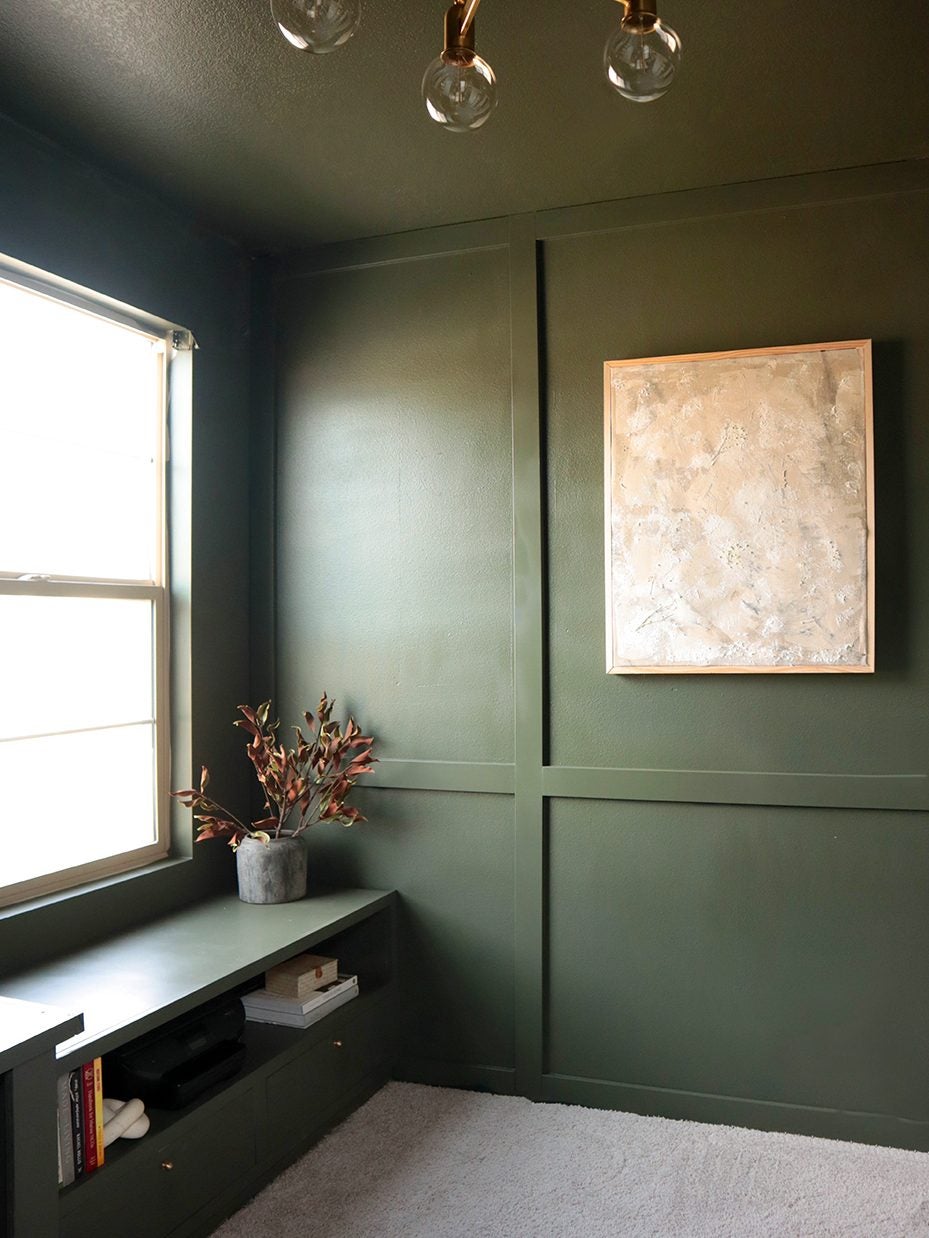
Step one was disassembling the makeshift wood desk her husband had built as an alternative to the IKEA table so she could properly secure the 2-by-4s and plywood top to the wall, floor, and each other. Next up, she made a small side cabinet out of 2-by-4s that would help support the desk portion and offer some storage.
Guerrero measured what distance was left between the right side of the desk and the wall to get the dimensions of her bench, which would call for a top, bottom, and two small drawers. “When you break it down, you’re building a bunch of boxes,” she says. “If you can build a small box, then you can build a big box.”
Trust Your Level, to an Extent

The inset drawers were the most intimidating part and, unsurprisingly, the most challenging section to build because they involved hardware, which in turn called for a lot of complicated math. Guerrero successfully created the first one in a single try, but when she went to install the second drawer, she found it was way too snug and would barely open. “I was like, this would happen to me. I made the draw boxes the exact same size,” she says, laughing. It turned out the shelf above the drawers wasn’t perfectly straight (even though the little bubble on the level was in the middle, it wasn’t dead center). “It will throw your measurements off by a hair,” she says. Luckily, the fix was simple: Sand the drawer down a bit.
Make Things Functional
One thing she wishes she would have incorporated into her design from the get-go? A brace in the open-shelf nook under the bench so she could truly lounge on the seat. “My cat sits on it, but I really don’t,” she says. Adding the extra support is on her to-do list.
Trust Your Gut—Er, Wood Glue
Guerrero’s advice to others who want to tackle anything built-in? Use sturdy wood glue for everything. The adhesive is the difference between furniture lasting a few years and stuff that lasts forever. Guerrero relied on securing most of her pieces with screws because she knew that if she messed something up she could just go back and start over (with wood glue, you can’t do that). “I was so afraid of messing up that I wasn’t even really confident in myself,” she says. So go ahead, make the leap, buy a brand-new tool, and build something—you’ve got nothing to lose.
For hands-on advice from designers and pro DIYers, plus more scrappy before-and-after transformations, subscribe to Reno. Let your in-box do all the hard work—for now.