This Couple Saved $8K by Hacking an IKEA Pax System Into Their Dream Walk-In Closet
Chris Loves Julia’s tutorial came in handy.
Published Aug 30, 2022 1:30 AM

We may earn revenue from the products available on this page and participate in affiliate programs.
The day Jarod Sabatino’s closet door came off its track, he knew it was officially time to rethink the whole sliding setup. “If I had to get clothes out of there, I’d have to force it over or lift it. It was a nightmare,” he recalls. Sabatino and his partner, Tim, lucked out: The primary bedroom in their 1930s Chicago suburbs home is huge by most standards (11-by-25 feet). The experienced DIYers knew there was an opportunity to add at least 3 more feet to the preexisting closet to create a spacious walk-in. The question was: How?

The pair shopped for quotes at the Container Store and California Closets first, but after hearing numbers around the $7,000 and $12,000 mark, respectively, they decided to go a more affordable route: the IKEA Pax wardrobe. For inspiration and some know-how, they looked to design bloggers Chris and Julia Marcum, who had documented their own journey customizing the Pax system for their walk-in closet. “Taking something generic (cost-effective particleboard wardrobes) and turning them into something great-looking was so satisfying,” says Sabatino, looking back on the project. When all was said and done, they spent a mere $3,935. Ahead, he breaks down their main expenses and shares a few tips along the way.
The Doors With Character: $355
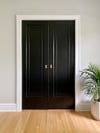
After creating a new barrier with drywall ($150), the couple went to their local Reuse Depot to hunt for antique closet doors. (The store is essentially where all parts and pieces of to-be-demolished homes go to live.) “We wanted it to feel like it was always part of the house,” says Sabatino. After painting the doors black to avoid having clashing wood tones in the room, they installed them in a pocket frame to help save space. That way no one has to worry about getting bumped by a swinging door when they’re getting dressed.
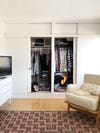
The Hacked Pax: $1,570
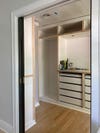
The biggest tip the couple took away from the Marcums’ go-around was to add trim pieces and door fronts to IKEA’s wardrobe system to make the closet look like a custom built-in. One key step was doubling up on the single, half-inch shelves to make them appear more substantial. They covered any and all seams with wood pieces they picked up from the hardware store, then filled in the cracks with caulk.
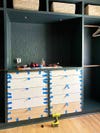
To create the look of a built-in dresser, they smooshed two individual open-drawer units together and, through a combination of drilling and gluing, attached fronts to hide the gaps.
The Tricky Paint: $149
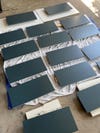
The most difficult part wasn’t all the math that went into making the bespoke parts to fit around the wardrobes, but rather the priming. Sabatino learned that using a shellac-based coating (while wearing a respirator mask) is the way to go, so that your desired paint color goes onto the annoyingly glossy products smoothly. “It’s not fun on a hot summer day,” he notes.
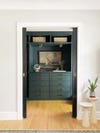
The back-wall piece that’s perpendicular to the countertop came in their IKEA order, but the board was visibly flimsy and had a seam down its center. To cover it up, they swathed it in a textured wallpaper and then painted it the same green color of the cabinets (Narragansett Green by Benjamin Moore) to completely hide the crack.
The Low-Profile Lighting: $1,124

The only major mismeasurement happened when the pair went to install the canned light fixtures in the newly shiplap-covered ceiling. (Psst: The paneling rang in at $200.) “You could tell that one of them was off by a foot,” recalls Sabatino. The mistake set them back a smidge. They filled in the hole and drilled a new one. Adding the splurge-worthy Kelly Wearstler–designed fixtures over the dresser was a surprisingly easy feat thanks to the particleboards being hollow, allowing them to run conduit through the insides of the shelving above.
The On-Theme Crown Molding: $83
Adding crown molding to the space was a twofold decision: It’s cohesive with the rest of the home’s style (there is similar plaster cove molding in the couple’s kitchen) and it makes the space look all the more professional. The tricky part was that it requires detailed cuts in the corners. “A lot of caulking went into it,” says Sabatino.
The Snazzy Rods: $248

The finishing touches included custom rods cut to size and stained the same walnut hue as the floors throughout the house. Sabatino made up for the expense by buying the drawer hardware from Amazon ($56). “Having this space makes mundane tasks like folding laundry that much more fun,” he says. “The house is pushing 100 years old and there is no en suite. That said, we think the walk-in closet adds much more value.”